
5 Best Garden Fence Sprayers in 2026: Buyer’s Guide, Reviews & Tips
- Garden fence sprayers save time and effort by providing faster, more even coverage than traditional brushes or rollers, making them ideal for large fence, shed, and outdoor painting projects.
- Different types of fence sprayers, including manual, electric, battery-powered, and professional airless/HVLP models, offer different benefits depending on project size, coating type, and user requirements.
- Proper preparation, correct spraying technique, regular cleaning, and safety precautions are essential for achieving a smooth finish, extending sprayer life, and protecting the surrounding environment.
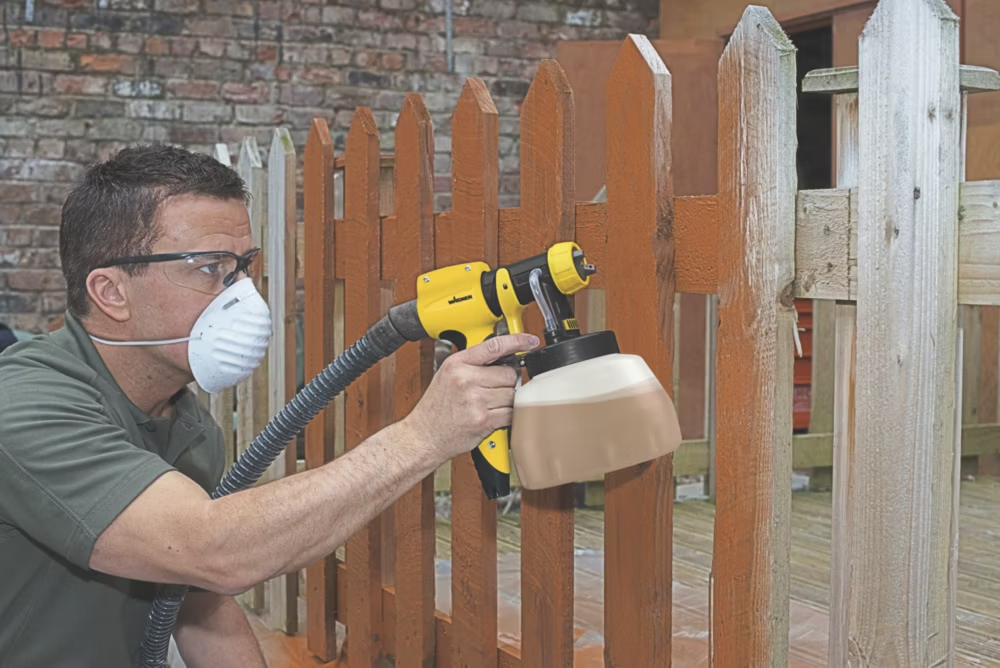

Painting or protecting a garden fence can be a time-consuming task when done with traditional brushes and rollers. A garden fence sprayer makes this job faster, easier, and more efficient by providing smooth coverage and reaching difficult areas that are hard to paint manually. Whether you want to refresh an old wooden fence, apply a protective stain, or give your outdoor space a new look, choosing the right sprayer can save both time and effort.
| Product | Title & Rating | Features | Explore |
|---|---|---|---|
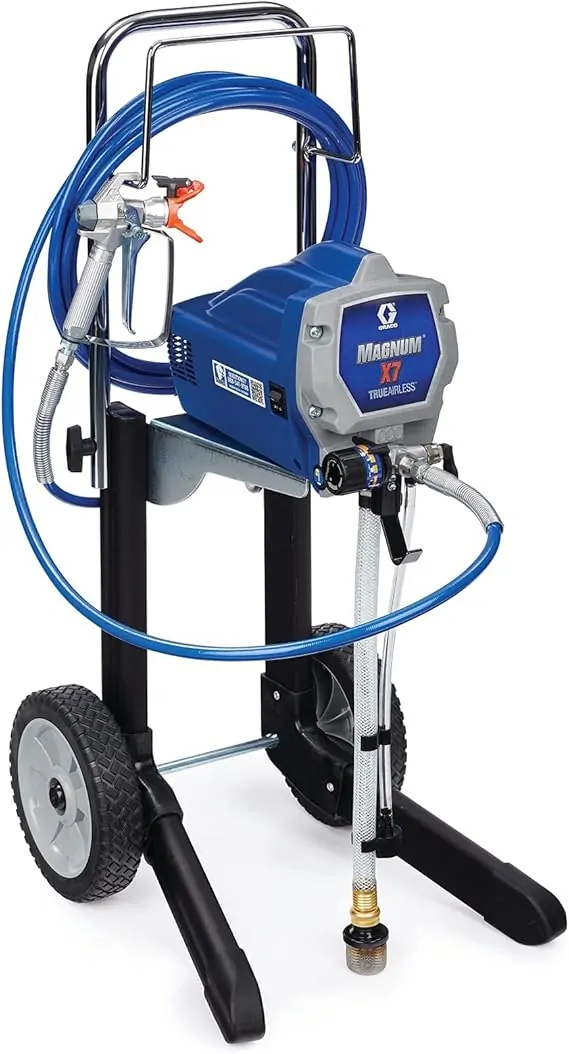 | Graco Magnum X7 Cart Garden Fence Sprayer⭐ 4.9 |
| Check Price |
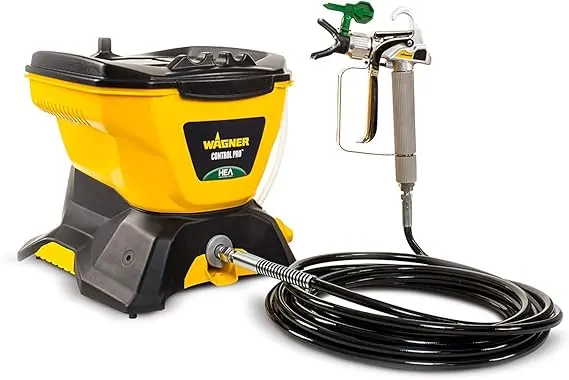 | Wagner Control Pro 130 Power Tank Sprayer⭐ 4.7 |
| Check Price |
 | HomeRight C800971.A Super Finish Max Extra Power Painter⭐ 4.8 |
| Check Price |
5 Best Garden Fence Sprayers in 2026 to Save Time on Painting
Gardening and keeping your outdoor space attractive requires regular care of fences, plants, and other garden structures. With time, I have tested different garden fence sprayers to find easier and more effective solutions for these tasks. In this article, I am sharing my reviews of the five best garden fence sprayers that I have personally tested and used. These sprayers helped me complete jobs like applying paint, wood stains, and protective coatings more quickly, efficiently, and with less mess. Based on my practical experience, I will explain their features, performance, and useful tips to help you select the right sprayer for your garden projects.
1. Graco Magnum X7 Cart Garden Fence Sprayer
The Graco Magnum X7 is a cart-style airless paint sprayer made for DIY homeowners, repair workers, and small professional projects. It features a durable stainless steel piston pump that allows you to spray paint without thinning it, helping you save time while maintaining the original paint quality. The sprayer can take paint directly from both 1-gallon and 5-gallon buckets, making it a great choice for bigger projects such as houses, fences, decks, and stucco surfaces.
expert start
What Is It and Its Features
A major advantage of this sprayer is its fully adjustable pressure control, which allows you to adjust the paint flow according to different surfaces and project needs. Another useful feature is the RAC IV SwitchTip, which helps remove clogs quickly. If the spray tip becomes blocked, you can simply reverse it and continue working without wasting much time.
Why It Matters
The sprayer can handle up to 100 feet of hose, which makes it suitable for painting multi-story homes and large outdoor areas. Cleaning is also easier because of the PowerFlush adapter, which connects directly to a garden hose. These features are important because airless sprayers can seem difficult for beginners, but Graco has included several options that make this model easier and more convenient to use.
My Set-Up and My Experience
I used this sprayer for both interior latex paint and exterior stucco paint, and the overall setup was simple and straightforward. I sprayed directly from 5-gallon paint buckets, which worked very well. I did mix the paint before use, but I did not always strain it, and still experienced very few clogging problems. Whenever a clog appeared, reversing the spray tip solved the issue quickly. The cart-style design was also very helpful when covering larger areas.
Performance
The performance of this sprayer is one of its strongest points. It applies thick latex paint smoothly with strong and consistent pressure. Large areas, including rooms and exterior walls, can be covered much faster compared with traditional painting methods. After proper masking and preparation, I was able to complete painting tasks in a short time.
For outdoor projects, especially around lawns and garden areas, this sprayer performed much better than using a roller or brush. Rollers can collect dust and dirt, while the sprayer provided a cleaner and more even finish. However, overspray can happen, especially when using higher pressure settings, so proper masking is essential.
The spray pattern became easier to control with more practice. With every new room, handling the machine felt more comfortable. The hose length was also enough for most indoor projects, reducing the need to frequently move the sprayer.
Practical Tips
- Always cover and mask areas properly before spraying
- Use strong tape to keep drop cloths securely in place
- Keep a bucket of water nearby when taking breaks between coats
- Place the spray tip in water during short breaks
- Reverse the tip to quickly remove paint clogs
- Cover hoses with plastic bags when moving the unit
- Clean small parts using an old toothbrush
expert end
pro start
| Pros | Cons |
|---|---|
| ✔️ Provides powerful and consistent spraying performance | ❌ Can create overspray if masking is not done properly |
| ✔️ Allows painting without thinning | ❌ Cleaning requires extra time |
| ✔️ Beginner-friendly after basic practice | ❌ Bucket hook design could be improved |
| ✔️ Offers adjustable pressure control | ❌ Hose length may not be enough for very tall exteriors |
| ✔️ Cart design makes transportation easier | ❌ Too powerful for very small painting tasks |
pro end
2. Wagner Control Pro 130 Power Tank Sprayer
The Wagner Control Pro 130 Power Tank is a stationary, high-efficiency airless paint sprayer designed for homeowners and large painting projects. It comes with a 1,5-gallon paint tank, a 25-foot hose, and Wagner’s HEA (High Efficiency Airless) technology. This technology helps reduce overspray by up to 55% compared with traditional airless sprayers, which means less wasted paint, less mess, and easier cleanup.
expert start
What Is It and Its Features
One of the biggest advantages of this sprayer is its ability to spray unthinned paints and stains directly from the container. It works with different materials, including latex paints, primers, acrylic enamels, and oil-based paints. The large paint tank allows you to continue working for longer periods without frequent refilling, which is especially useful for larger projects. It also includes a 515 HEA spray tip that performs well with latex paints, while additional tips can be used for stains and sealers.
Why It Matters
These features are important because they help reduce working time, minimize mess, and make large painting projects easier for homeowners. Instead of spending several days using brushes and rollers, this sprayer allows you to complete projects much faster while achieving a smoother and more uniform finish.
My Set-Up and My Experience
I bought the Wagner Control Pro 130 mainly for painting my kitchen cabinets. The project included 31 cabinet doors and 13 drawer fronts that were previously stained and needed a fresh white finish. My main goal was to achieve a smooth, professional-looking result that is usually difficult to get with brushes and rollers. The sprayer made it possible to apply paint evenly on both sides of each piece.
Performance
The performance of the Control Pro 130 is excellent considering its price range. It applies a large amount of paint quickly and efficiently. The HEA technology makes the spray softer and easier to control compared with traditional airless sprayers, which is helpful for beginners. However, some overspray can still occur, especially during indoor projects, so proper covering and preparation are still necessary.
Practical Tips
- Test the sprayer on cardboard or extra material before starting your project
- Keep the spray gun moving continuously to prevent paint runs
- Apply several thin coats instead of one heavy coat
- Cover and protect nearby surfaces before spraying
- Clean the sprayer immediately after finishing each job
expert end
pro start
| Pros | Cons |
|---|---|
| ✔️ Paints much faster than traditional rollers | ❌ Requires some practice for beginners |
| ✔️ Creates a smooth professional finish | ❌ Cleaning requires time and effort |
| ✔️ Large tank reduces the need for frequent refilling | ❌ Overspray can still happen indoors |
| ✔️ Works with unthinned paints and stains | ❌ Not the best option for small repair jobs |
| ✔️ Offers good value for home projects | ❌ Hose and power cord may feel stiff |
pro end
3. HomeRight C800971.A Super Finish Max Extra Power Painter
The HomeRight Super Finish Max is a High Volume Low Pressure (HVLP) paint sprayer made for DIY users and homeowners. It features a 40-ounce paint container, which provides enough capacity for medium to large projects without needing frequent refills. The sprayer uses a 450-watt motor, so it works without an external air compressor. This makes it simple to operate, especially for people completing painting tasks at home, in workshops, or around the garden.
expert start
What Is It and Its Product Features
A major advantage of this sprayer is its three brass spray tips. Brass tips are stronger, more durable, and usually provide better performance than plastic tips. The sprayer comes with a 4.0 mm tip for thicker paints and primers, a 2.0 mm tip for latex and chalk paint, and a 1.5 mm tip for stains and sealers. You can also change the spray pattern between horizontal, vertical, and round settings according to the surface and project requirements.
Why It Matters
This feature is important because outdoor and garden projects often include uneven surfaces such as wooden fences, outdoor furniture, and textured panels. Adjustable spray settings help reduce overspray, prevent unnecessary material waste, and create a more even finish compared with traditional brushes or rollers.
My Set-Up and My Experience
Setting up the HomeRight Super Finish Max was quick and easy. All components connected smoothly, and the instructions were simple to understand. I mainly used this sprayer for wooden garden fences, outdoor tables, and storage cabinets. I also tested it on indoor cabinets to check its versatility. For fence staining, I used the 1.5 mm tip, while thicker outdoor paints worked better with the 2.0 mm tip. Some paints required slight thinning, but the amount was less compared with many weaker sprayers.
Performance
The performance of this sprayer is impressive for small to medium-sized projects. It produces a consistent spray, and after proper adjustment, it creates a smooth finish that looks professional. When used on fences and wooden surfaces, it covered areas much faster than a brush and provided a more uniform result. Latex paints sometimes needed thinning, especially thicker formulas. If the paint was not properly strained, the tip could become clogged, but regular cleaning of the tip during use helped prevent this problem.
Practical Tips
- Always strain paint before adding it to the tank
- Thin latex paint slightly to improve spray flow
- Test the spray pattern on cardboard before starting
- Clean the spray tip during longer painting sessions
- Wash the sprayer immediately after finishing work
- Store small parts safely in one container
- Select the correct tip according to the material
expert end
pro start
| Pros | Cons |
|---|---|
| ✔️ Produces a smooth and consistent spray finish | ❌ Thick paints may require thinning |
| ✔️ Large tank reduces the need for frequent refilling | ❌ Spray tip may clog without regular cleaning |
| ✔️ Durable brass tips provide long-lasting performance | ❌ Not ideal for painting ceilings |
| ✔️ Adjustable spray patterns provide better control | ❌ Cleaning requires extra time |
| ✔️ Works without an external compressor | ❌ Small components can be misplaced easily |
pro end
4. Fuji 2202 Semi-PRO 2 HVLP Spray System
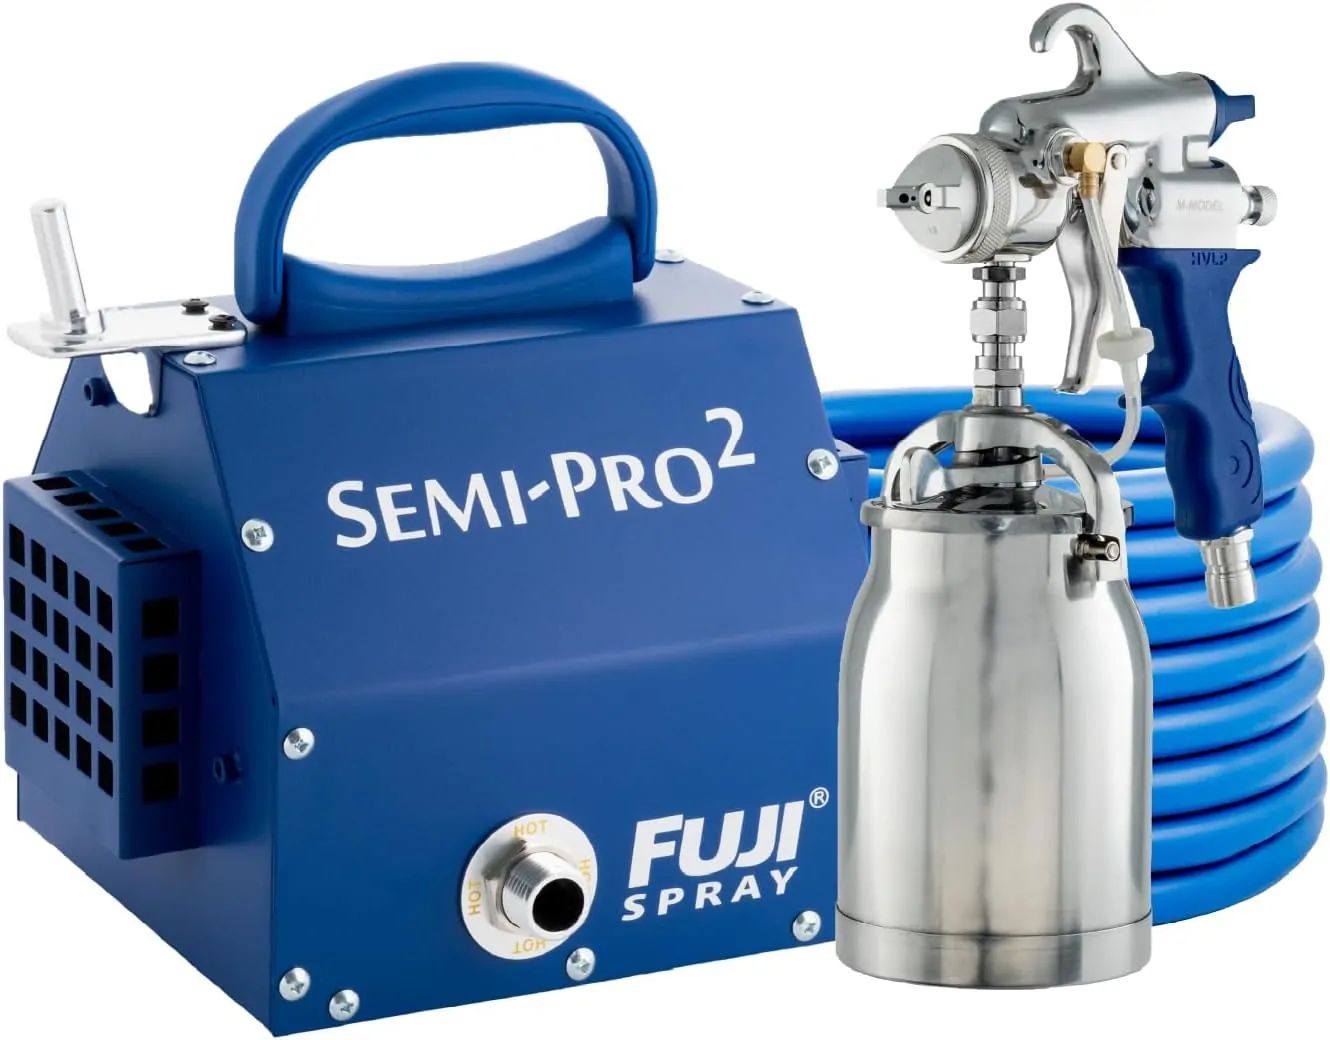
The Fuji Spray Semi-PRO 2 is a professional-grade HVLP (High Volume Low Pressure) spray system designed for hobbyists, weekend painters, and small workshops. It includes a 1-quart bottom feed metal spray gun, a powerful 1400-watt 2-stage motor, and a 25-foot flexible hose. The complete system is protected inside a strong metal turbine case, which also provides a convenient holder for the spray gun.
expert start
What Is It and Its Features
One of the key features of this system is the non-bleed M-Model spray gun. This design allows air to flow only when the trigger is pressed, which helps reduce paint waste and unnecessary overspray. It comes with a 1.3mm air cap already installed, making it suitable for thin to medium materials such as stains, sealers, lacquers, and properly thinned paints.
Why It Matters
The fan pattern control knob allows users to adjust the spray from a small round pattern to a wider fan shape. This flexibility is useful when working on different surfaces and materials. These settings are important because they provide better control, create smoother finishes, and reduce mess during painting. For gardeners and DIY users, this means less wasted material, less effort, and professional-looking results.
My Set-Up and My Experience
Setting up the Fuji Spray Semi-PRO 2 was easy and straightforward. I connected the hose, filled the bottom feed cup, plugged in the unit, and tested the spray on cardboard before starting my actual projects. I mainly used it for garden furniture, wooden cabinets, doors, and fences. I also tested it with latex paint, wood stain, and clear finishes. Finding the correct paint thickness required some adjustment, especially when working with latex paint.
Performance
The performance of this sprayer is where it performs exceptionally well. After adjusting the settings correctly, it produces a fine and even spray mist. The final coating looks smooth and professional, without brush marks or uneven texture. It performed especially well with lacquer and properly thinned paints because the material spread evenly without creating runs or streaks. The motor provides strong and consistent power. Although the turbine produces some noise, it is quieter compared with many other spray systems.
Practical Tips
- Always test the spray on cardboard before painting the actual surface
- Add thinner slowly and mix the paint properly
- Begin with a smaller fan width and increase gradually
- Use ear protection and breathing protection during operation
- Clean the spray gun immediately after every use
expert end
pro start
| Pros | Cons |
|---|---|
| ✔️ Strong and long-lasting metal construction | ❌ Turbine noise may require ear protection |
| ✔️ Creates a smooth and professional finish | ❌ Additional spray tips require extra cost |
| ✔️ Simple spray pattern adjustment | ❌ Replacement parts may need to be purchased online |
| ✔️ Long hose provides better working freedom | ❌ Requires some practice for correct paint thinning |
| ✔️ Detailed and easy-to-follow instruction manual | ❌ Can feel slightly heavy during extended use |
pro end
5. Wagner Spraytech Control Spray Max HVLP
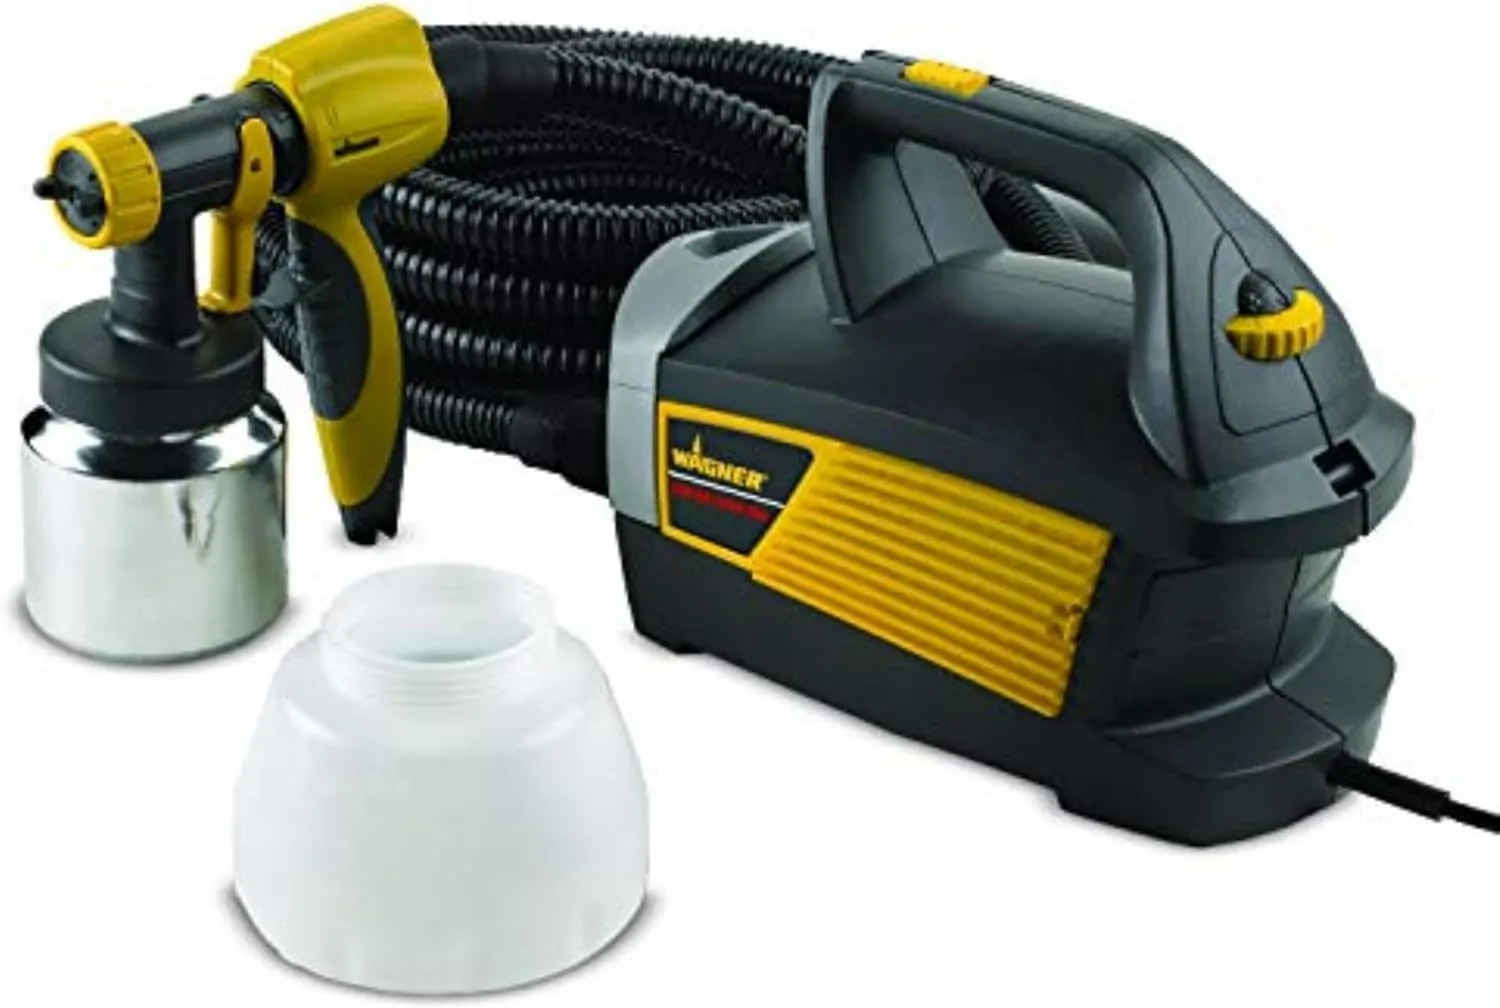
The Wagner Control Spray Max is a corded HVLP (High Volume Low Pressure) paint sprayer made for small to medium-sized painting projects. It works by using a high volume of air at low pressure to turn paint into tiny particles, creating a smooth finish with minimal overspray.
expert start
What Is It and Its Product Features
Important features include a two-stage turbine, a 1.5-quart plastic paint cup, and an extra 1-quart professional metal cup. The base unit stays on the floor, while the spray gun connects through a 20-foot flexible hose. This setup helps reduce hand strain and allows comfortable spraying for longer periods.
Why It Matters
This sprayer offers three adjustable spray patterns: horizontal, vertical, and round. It also includes a pressure control dial and material flow adjustment system, giving you better control over paint output and spray width. These adjustments are useful because different surfaces require different approaches. Cabinets require accuracy, decks need wider coverage, and trim work needs detailed control.
My Set-Up and My Experience
Preparing the Wagner Control Spray Max is simple. The hose attaches quickly, the paint cup fits firmly, and the controls are easy to understand. My first big project with it was interior trim and wainscoting, which can be challenging to spray evenly. I first tested it on cardboard, checked paint viscosity with the included cup, and slowly adjusted the material flow. I used both oil-based and water-based paints with proper thinning and additives such as Floetrol and Penetrol. The sprayer worked smoothly with all of them.
Performance
The performance of this sprayer is where it stands out. It produces a fine, consistent, and controlled spray pattern. After making the correct adjustments, the final finish looks smooth and professional without brush marks or roller lines. Compared with lower-cost sprayers I have used, this model works faster, covers surfaces more efficiently, and experiences fewer clogs. Cleaning is also simple. The nozzle can be removed within minutes, and cleaning the parts with water or thinner removes leftover paint easily.
Practical Tips
- Always test the sprayer on cardboard before starting your project
- Adjust paint thickness according to the sprayer instructions instead of only following the paint label
- Use paint filters to reduce the chance of clogging
- Keep the spray gun moving continuously to avoid paint runs
- Clean the sprayer immediately after finishing your work
expert end
pro start
| Pros | Cons |
|---|---|
| ✔️ Creates a smooth, professional-looking finish | ❌ Paint usually needs thinning before use |
| ✔️ Lightweight and comfortable spray gun design | ❌ The hose may feel slightly inconvenient sometimes |
| ✔️ Produces very low overspray | ❌ Not the best choice for extremely large projects |
| ✔️ Simple cleaning and maintenance process | ❌ Requires some practice to achieve the best results |
| ✔️ Compatible with many different paint types | ❌ Turbine produces noticeable noise |
pro end
A Home Gardener’s Guide to Fence Sprayers
Gardening is a favorite activity for many homeowners around the world. In countries such as the UK and the US, a large number of households have gardens. Research and surveys suggest that around 80–90% of UK homes have some type of garden area, and many of these gardens include fences, sheds, decks, and other wooden structures that require regular maintenance. Every year, people spend billions of dollars or pounds on gardening tools and products to maintain attractive and long-lasting outdoor spaces.
One useful tool for protecting and refreshing outdoor wooden surfaces is a garden fence sprayer. It is a handheld or portable spraying device used for applying paint, wood stain, preservatives, and other liquid treatments to fences, sheds, decking, and similar garden structures.
Garden fence sprayers are available in several designs, but their main purpose is the same: applying coatings over large outdoor surfaces faster and more evenly compared with traditional brushes or rollers. They may also be known as pressure sprayers, paint sprayers, or pump sprayers. Using the right sprayer can make large garden maintenance tasks much quicker and easier.
Why Use A Garden Fence Sprayer?
Garden fence sprayers have become popular because they help solve many common difficulties associated with outdoor painting and staining. Wooden fences, sheds, and decks are constantly exposed to sunlight, rain, moisture, and changing temperatures. Over time, protective coatings can break down, making the wood more likely to suffer from rotting, fading, or discoloration.
Fences can especially become grey, damaged, uneven, or affected by algae growth when they are not treated regularly. Applying paint or wood preservative creates a protective layer that helps slow this deterioration. However, covering a large fence evenly with a brush or roller can require a lot of time and effort. A sprayer makes this process much faster by spreading the coating across the wood surface efficiently.
A sprayer can also reach small gaps, corners, joints, nails, and hinges more easily. When using a brush, these areas can be difficult to access and may require additional tools for proper coverage. With a sprayer, the nozzle can often be adjusted to create a fine mist that reaches narrow spaces. Many garden sprayers allow users to change the spray pattern from a wide fan shape to a narrow cone, providing better control for different areas of the fence.
Another major advantage of using a sprayer is achieving a more consistent coating. It delivers a continuous layer of paint, stain, or preservative across the surface. This consistency is important because uneven application, such as thick spots or thin areas, can reduce the effectiveness of wood protection. A quality sprayer helps create a more balanced finish and better weather resistance.
However, spraying can create overspray, which means small liquid droplets may travel beyond the target area. For this reason, nearby plants, windows, furniture, and other surfaces should be covered before starting. Despite this small limitation, the speed, coverage, and professional appearance achieved with a sprayer often make it a valuable tool for homeowners. For many gardening projects, the time saved and improved results make using a sprayer a practical choice.
Types of Garden Fence Sprayers
Garden fence sprayers are available in different forms to match various tasks, experience levels, and budgets. Some models are basic manual pump sprayers, while others use electric motors or battery power. Although their designs vary, most sprayers include three main parts: a tank for holding liquid, a pumping system, and a spray nozzle or gun. The nozzle usually has adjustable settings, allowing users to create a fine mist for smooth coverage or a wider spray pattern for covering larger areas quickly.
Selecting the right sprayer depends on several factors, including project size, frequency of use, and available budget. For a small garden fence, a 5-liter handheld pump sprayer may be enough. For larger properties with many fence panels, a cordless sprayer or electric-powered model may provide better efficiency. The image above shows different types of sprayers, from small bottle-style designs to larger shoulder-mounted tanks. No matter the style, the main goal remains the same: making fence painting and treatment faster, easier, and more effective.
1. Manual Pump Sprayers (Handheld or Backpack)
These sprayers usually have a plastic container design or a backpack-style tank with a manual pump. You fill the tank with paint, stain, or treatment liquid, close the container, and pump it to create pressure inside. When the trigger is pressed, the built-up pressure pushes the liquid through the nozzle and creates a spray. Handheld models commonly hold a few liters of liquid, usually around 2–5 liters, and include a pump handle attached to the top.
Backpack or “knapsack” sprayers are designed to be carried on the back and usually have larger capacities, commonly between 5–20 liters. Manual sprayers are affordable, easy to operate, and widely used by gardeners. Since they do not require electricity or batteries, they can be used in almost any location. However, manual pumping can become tiring during large projects because pressure gradually decreases and requires repeated pumping. Treating a long fence or applying thick coatings may require significant physical effort.
2. Electric (Corded) Sprayers
Electric sprayers use powered pumps to create pressure and move liquid through the nozzle. They usually have a spray gun connected by a hose to a paint container or motor unit. These models are connected to a wall outlet or generator to operate. Because the pump maintains steady pressure while running, electric sprayers provide more consistent spraying and reduce physical effort during larger projects.
The main disadvantages are the need for electricity and the limitation caused by the power cord. You may need an extension cord for larger areas, and extra care is required to avoid tripping hazards. Electric sprayers are also generally more expensive than manual models. However, many provide faster application speeds and can work with different materials, including water-based and solvent-based products, when the correct model is selected.
3. Battery-Powered (Cordless) Sprayers
A growing trend in the market is battery-powered sprayers, which provide a balance between manual and electric models. These sprayers use a rechargeable battery (commonly 18–20 volt, similar to many standard power tools). The battery powers the pump, removing the need for manual pumping and eliminating the need for a direct power connection. You simply fill the tank, switch on the unit, and the battery-operated pump starts spraying. The main advantage is freedom of movement – you can easily move around your garden or yard, including areas far away from power outlets, without dealing with cables.
These sprayers are very useful for people with large gardens or anyone who wants to avoid the inconvenience of electrical cords. Older cordless models often had limited battery life and required frequent charging, but modern versions have improved significantly. The disadvantages include extra weight because of the battery and a higher price compared with manual sprayers. Additionally, when the battery becomes empty, you must recharge it or replace it with another battery before continuing your work.
4. Compressed Air (Airless/High-Volume Low-Pressure) Sprayers
In professional painting applications, airless sprayers and HVLP (High Volume Low Pressure) systems are commonly used, especially for large-scale projects. Airless sprayers work by pushing paint through the nozzle at very high pressure, allowing fast and efficient coverage. HVLP sprayers use a turbine or compressor to produce a controlled and smooth spray pattern.
These systems can provide a very fine and professional-quality finish, but they are generally larger, more expensive, and more suitable for professional users. Most regular gardeners do not need these types of sprayers, but they can be useful for people who want a professional painting result on fences or large wooden structures. The basic working idea is still the same (forcing liquid through a nozzle), but the equipment is designed for more demanding applications.
How a Fence Sprayer Works
The working process of a garden fence sprayer is simple and easy to understand. First, you fill the tank or container with the paint, stain, or wood preservative you want to apply. Many fence coatings require slight thinning or dilution so they can move smoothly through the sprayer (always check the product instructions to prevent clogging or damage). After filling the tank, close it properly and prepare the sprayer for operation.
Manual Sprayers: In a hand-pump sprayer, pressure is created by manually pumping the handle. This action increases air pressure inside the tank, similar to how air builds inside an inflated balloon. When you press the trigger on the spray nozzle, this stored pressure pushes the liquid through the nozzle. The nozzle then breaks the liquid into small droplets, creating a spray mist. The liquid continues flowing while the trigger is pressed, and spraying stops when the trigger is released or when the pressure inside the tank becomes too low.
Electric/Battery Sprayers: In electric and battery-powered models, the pump does the work instead of manual pumping. After switching on the device, the electric motor powers the pump, which pushes the liquid through a high-pressure hose toward the nozzle. The trigger usually controls liquid flow rather than creating pressure. When the machine is running, the pump maintains consistent pressure automatically. These sprayers usually have a separate liquid tank (which may be attached to the unit or carried as a backpack), while a hose transfers the liquid to the spray gun. Pulling the trigger opens a valve, allowing the paint or liquid to flow out.
The nozzle is one of the most important components of a sprayer because it controls the spray pattern. Many sprayers allow users to adjust the nozzle settings or change different spray tips. You can create a circular cone spray pattern (similar to a focused spotlight) or a wider flat fan pattern. For fence painting, a flat fan spray is often preferred because it covers wider boards more efficiently. A cone pattern can be helpful for corners, edges, and narrow spaces. Some models also allow adjustment of flow rate and pressure according to the application requirement.
Some sprayers are designed only for thin liquids such as weedkillers and may become blocked if thick paint or heavy stains are used. Other models are specifically manufactured to handle paint, wood preservatives, and thicker coatings. Always check the manufacturer’s recommendations before use. If you change between different liquids or chemicals, clean the sprayer properly to avoid contamination and clogging.
After completing the spraying process, you should stop the machine, release the pressure (using a release valve if available or switching off the unit), and clean the sprayer. Cleaning usually involves flushing the system with water or a suitable solvent depending on whether the product used was water-based or oil-based. This step is extremely important because leftover paint can block internal parts, damage the pump, or cause corrosion. Every sprayer should be cleaned carefully before storage.
Using a sprayer successfully also requires proper preparation. Before painting, clean the fence surface properly (usually using a pressure washer or stiff brush to remove dirt, mold, and loose paint). Choose a dry and calm day because wind and rain can negatively affect the final finish.
Protect nearby plants, patios, furniture, and other surfaces by covering them with tarps, plastic sheets, or cardboard. Wear protective equipment such as safety goggles, gloves, and a mask or respirator. Maintain a consistent distance from the fence (usually around 20–30 cm) while spraying, and move the sprayer smoothly across the surface. A good technique is to slightly overlap each spray pass, similar to painting a wall with a roller or brush. If multiple coats are required, allow enough drying time between each coat according to the paint or stain instructions.
Advantages and Disadvantages of Lawn Fence Sprayers
For many large fence, shed, or outdoor painting projects, the speed and smooth coverage provided by sprayers make them a valuable tool. However, for smaller tasks (such as painting a single gate), using a brush may be easier and more practical. Before buying a sprayer, consider the size of your project, the cost of the equipment, and the cleaning effort required. If you only need to paint a small area occasionally, a brush may be enough. But if you have a large garden with multiple fences, sheds, or wooden structures, a sprayer can save significant time and effort. Like every tool, a garden fence sprayer has both advantages and limitations.
Advantages include:
- Speed: Sprayers can cover large surfaces much faster compared with traditional brushes or rollers. A large fence can often be completed in a much shorter time. This allows you to finish projects in a single day that may otherwise require several days when using manual painting methods.
- Efficiency: Sprayers reduce physical effort because the pump or motor handles the paint distribution instead of continuous brushing. This is especially helpful when working on long fences or large outdoor areas. They also provide more consistent paint application, which can help reduce unnecessary material waste.
- Even Coverage: A sprayer creates a fine mist that spreads evenly across the wooden surface. This helps prevent visible brush marks, uneven layers, streaks, and missed areas. As a result, the fence receives more consistent protection.
- Reach: Sprayers are excellent for reaching difficult areas such as gaps, joints, corners, and uneven surfaces where a traditional brush may struggle. Spray can easily enter spaces between fence boards, around railings, and into detailed wooden designs.
- Versatility: Many modern sprayers can perform multiple garden tasks. The same equipment may be used for applying fence stains, shed paint, deck sealers, herbicides, or even cleaning solutions for outdoor surfaces. This makes them a useful tool for different gardening and maintenance activities.
Disadvantages and cautions include:
- Overspray: Spraying creates a fine mist that can travel beyond the target area. Because of this, nearby plants, grass, furniture, walls, and other objects need proper protection. On windy days, the spray can move even farther away from the fence. Unlike brushes, sprayers require more preparation to cover and protect surrounding areas.
- Waste: Due to overspray and fine droplets, sprayers may use more paint or stain compared with brushing. Some material may land outside the intended surface or bounce away from the fence. Proper technique and correct settings can reduce this problem, but it should still be considered before use.
- Messiness: Spraying can create a mess if proper precautions are not taken. Paint droplets may reach clothing, windows, nearby walls, or other surfaces that were not intended to be painted.
- Learning Curve: Using a sprayer effectively requires some practice. Users need to learn the correct distance, movement speed, and spray settings. Beginners may hold the sprayer too close, causing paint runs, or too far away, resulting in weak coverage. Practicing on scrap wood or cardboard before starting the actual project can improve results.
- Maintenance: Sprayers require careful cleaning after every use. While a brush can usually be cleaned quickly, sprayers contain hoses, nozzles, filters, and pumps that must be flushed properly. If paint dries inside these components, it can block the system and permanently damage the equipment.
- Initial Cost: The purchase price of a sprayer is higher than a basic brush or roller. High-quality electric and battery-powered models can be expensive. Manual pump sprayers are cheaper but are still generally more costly than simple painting tools. However, for large projects, the saved time and reduced effort can make the investment worthwhile.
- Limited Uses: Some sprayers are designed for specific materials only. For example, a garden sprayer made for herbicides may not be suitable for thick paints or stains. Always check the manufacturer’s guidelines regarding compatible liquids. Using one sprayer for multiple chemicals without proper cleaning can lead to contamination and unwanted chemical mixing.
Tips for Using a Garden Fence Sprayers
If you choose to use a fence sprayer, following the right techniques will help you achieve better results. Proper preparation, correct settings, and careful spraying methods can make the entire process easier. The most important factors are preparing both the fence and yourself before starting the work. With experience, spraying a fence can become as simple and routine as other regular garden tasks.
1. Choose the Right Day: Select a dry and calm day for spraying your fence. Strong wind can carry spray droplets away from the target area and create unwanted mess. If weather conditions are not suitable, it is better to wait. Avoid rainy, frosty, or extremely humid conditions because they can affect drying and paint adhesion. Moderate temperatures usually provide the best results.
2. Clean and Prep the Surface: Before applying any coating, clean the fence properly. Experts often recommend using a pressure washer or stiff brush to remove dirt, mold, mildew, and old peeling paint. A clean surface allows the coating to stick properly and improves durability. After washing, allow the wood to dry completely, usually for 24 hours or longer. Dry wood absorbs paint and stain better and helps prevent moisture from becoming trapped.
3. Mask Surroundings: Protect all areas that should not receive spray. Use protective sheets, drop cloths, cardboard, or old fabric to cover patios, plants, grass, and outdoor furniture. Painter’s tape can protect glass, metal parts, and other sensitive areas. Some gardeners also lightly spray nearby plants with water before painting because wet leaves may reduce paint droplets sticking to the surface.
4. Mix Your Coating Properly: Always read the instructions provided with your paint or stain. Many products need thorough mixing before use, and some thicker materials may require thinning. If thinning is recommended, adjust the mixture so the coating can easily pass through the sprayer without blocking the nozzle. Do not fill the tank beyond the recommended level because overfilling may create spills or pressure problems.
5. Practice First: If you are using a sprayer for the first time, test it on scrap wood, cardboard, or another unwanted surface. This helps you understand the spray pattern, flow speed, and coverage area. Practice adjusting the nozzle and maintaining the correct distance until you achieve a smooth spray without drips. This small preparation step can prevent wasted paint and uneven results.
6. Use Proper Spray Technique: Keep the nozzle approximately 8–12 inches away from the fence surface (the exact distance may vary depending on the sprayer model – many manufacturers recommend around 25–30 cm). Move the sprayer continuously and evenly across the fence. Avoid keeping the nozzle in one place for too long because this can create runs or heavy spots. Overlap each pass by about 30% of the spray width to ensure complete coverage. Moving too quickly can create a thin coat, while moving too slowly can cause dripping. For vertical fence boards, side-to-side spraying usually works well; for picket fences, vertical movements may be more effective.
7. Maintain Consistent Pressure: For manual sprayers, maintain regular pumping to keep the pressure stable. As pressure decreases, the spray pattern may become weaker and uneven. A common method is to pump until full pressure is reached, spray until the pattern becomes weaker, and then pump again. For electric and battery models, ensure the motor continues running properly and check that hoses and nozzles remain free from blockages.
8. Multiple Coats: Many wood coatings and protective treatments require more than one application. Always follow the instructions provided with your paint or stain product. If a second coat is needed, allow the first layer to dry completely before applying another one (usually several hours or overnight depending on the product). In some cases, light sanding between coats can improve adhesion, especially when applying different compatible coating systems, although this step may not always be required.
9. Clean Up Immediately: After finishing your spraying work, clean the sprayer as soon as possible. For water-based paints, flush the system with clean water. For oil-based paints and stains, use the recommended solvent such as mineral spirits. Run the cleaning solution through the spray gun to remove leftover material from internal parts and passages. Carefully clean the nozzle, valves, and other components where paint can collect. If paint dries inside the sprayer, it may create permanent blockages and damage the equipment. After cleaning, allow all parts to dry completely and store the sprayer in a cool, dry location.
10. Store Leftover Paint Properly: Keep any remaining paint or stain in a properly sealed and clearly labeled container. Store it in a garage, shed, or another suitable location away from extreme heat, cold temperatures, and direct sunlight. Proper storage allows you to use the remaining material later for repairs or touch-ups.
11. Safety Precautions: While garden fence sprayers are convenient and simple to operate, they involve chemicals and pressurized systems, so proper safety measures are important. Always follow safety practices similar to those used when handling paints, stains, pesticides, or other chemical products:
- Wear Personal Protective Gear
- If you are spraying in a partially enclosed location (such as a porch, narrow passage, or area between buildings), make sure there is enough ventilation and airflow.
- Keep children and pets away from the spraying area during application and until the treated surface is safe.
- Use only liquids that are approved for your specific sprayer. Never combine garden chemicals and wood treatments in the same sprayer without proper cleaning.
- Avoid excessive pumping of manual sprayers beyond the recommended pressure limit.
- When using a corded sprayer, avoid extension cords whenever possible. If an extension cord is necessary, use a heavy-duty outdoor-rated model.
- Clean Up Spills
- Dispose of empty paint containers, solvents, and contaminated cleaning water according to local safety and environmental regulations.
Following these safety guidelines allows you to operate your garden fence sprayer confidently and safely. Paints, stains, and pesticides can be harmful when handled incorrectly, but using the correct protective equipment and following manufacturer instructions helps protect both you and the surrounding environment.
Conclusion
Garden fence sprayers can greatly simplify the process of painting, staining, and protecting outdoor fences. By learning what these tools are, understanding their working process, and comparing their advantages and disadvantages, homeowners and gardeners can decide whether a sprayer is suitable for their needs. When used correctly and safely, a fence sprayer becomes a useful gardening tool that saves time, improves coverage, and helps maintain a beautiful and long-lasting fence.
Frequently Asked Questions (FAQs)
1. Can these garden fence sprayers handle thick paint or stains?
Yes, many selected garden fence sprayers are designed to work with different types of paints and stains with varying viscosities. However, users should always check the product specifications and follow the manufacturer’s guidelines to achieve the best spraying performance.
2. How do I clean and maintain my garden fence sprayer for longevity?
Regular cleaning is important for keeping your sprayer working efficiently for a long time. After every use, flush the system with the recommended cleaning solution according to the manufacturer’s instructions. Check important components regularly, lubricate moving parts when required, and store the sprayer in a dry and protected place to prevent clogging, rust, and corrosion.
3. Are these sprayers suitable for both DIY enthusiasts and professional painters?
Yes. The listed sprayers are suitable for different types of users, including DIY homeowners working on small projects and professional painters handling larger fence installations. Their adjustable settings, durability, and flexible features make them useful for beginners as well as experienced users.
references:
1. GUBIANI, R. (2024). Use of Agricultural Machinery and Equipment in Non-professional Vegetable Gardens. Gjornâl Furlan des Siencis-Friulian Journal of Science, (38), 69-84.
2. Ramesh, D., Chandrasekaran, M., Soundararajan, R. P., Subramanian, P. P., Palled, V., & Kumar, D. P. (2022). Solar-powered plant protection equipment: perspective and prospects. Energies, 15(19), 7379.
3. Edwards, B. (2026). Across the fence line: Civic Agriculture within Industrial Domination (Doctoral dissertation).
4. Rogovskii, I. L., Titova, L. L., Maksimovich, K. Y., Ohiienko, M. M., Smelik, V. A., & Scherbakov, A. P. (2021, March). Research of garden sprayer machines of near-stem and inter-stem strips of orchards. In IOP Conference Series: Earth and Environmental Science (Vol. 723, No. 2, p. 022035). IOP Publishing.
5. Kumar, A., Kumar, P., & Sharma, S. (2025). Enhancing farm security: A stochastic approach for understanding the performability of electric fencing systems. Discover Applied Sciences, 7(7), 721.
6. Lu, L., Liu, B., Mao, E., Song, Z., Chen, J., & Chen, Y. (2023). Design and optimization of high ground clearance self-propelled sprayer chassis frame. Agriculture, 13(2), 233.

